Ship This is a Silver trophy in Assassin’s Creed Black Flag Resynced for fully upgrading the Jackdaw. You need all 12 Ultimate Ship Plans, enough Reales and materials to buy every tier, and a fully upgraded Harbourmaster at Great Inagua. This guide gives you the current Resynced coordinates, a practical collection route and a final checklist that catches the upgrades players most often overlook.
Ship This Quick Overview
| Trophy | Ship This |
|---|---|
| Grade | Silver |
| Requirement | Fully upgrade the Jackdaw. |
| Ultimate Plans | 12 total: 6 from underwater shipwrecks and 6 from Treasure Maps. |
| Story gate | Complete Sequence 6, Memory 1, Diving for Medicines, to unlock the Diving Bell. |
| Great Inagua gate | Upgrade the Harbourmaster to its highest level so every final ship tier can be purchased. |
| Missable? | No. Every plan and upgrade can be completed in free roam after the story. |
| Practical full budget | 309,800 Reales, 4,755 Metal, 2,750 Wood and 550 Cloth for the Jackdaw and required Harbourmaster development combined. |

What Ship This Actually Requires
Collecting the plans only removes the locks. The trophy unlocks after you purchase the final remaining Jackdaw upgrade.
- Find all 12 Ultimate Plans. These unlock the highest tiers for the main weapons, armor, storage and harpoon upgrades.
- Develop Great Inagua. Max the Harbourmaster building or the top ship tiers can remain unavailable even when you own their plans.
- Buy every ordinary tier too. Earlier upgrades still cost Reales and cargo; a plan does not grant them automatically.
- Check upgrades without plans. Rowboat armor and the front-facing weapon line do not use Ultimate Plans for their final tier, but they still count toward a fully upgraded Jackdaw.
- Ignore cosmetics. Sails, figureheads, ship wheels, pets and other vanity slots are not part of Ship This.
Recommended Ship This Route
Start the trophy during the story, then combine plan hunting with forts, viewpoints and resource farming instead of sailing the map twice.
- Reach Sequence 6, Memory 1. Diving for Medicines unlocks the Diving Bell and takes you through San Ignacio Wreck, where the Hull Armor plan can be collected.
- Max the Great Inagua Harbourmaster. Buy its building upgrades whenever the next tier becomes available so the shop is ready before your final cleanup.
- Collect the other five diving plans. Clear the large Secret chest at Antocha Wreck, La Concepcion Wreck, Devil’s Eye Caverns, The Blue Hole and Kabah Ruins.
- Pair every Treasure Map with its dig site. Pick up the map first, then travel to the listed solution coordinate. The buried chest cannot be dug up in advance.
- Board material-rich ships along the way. Prioritize Metal, keep the cargo instead of repairing after every easy boarding, and sell excess Rum and Sugar for Reales.
- Finish at any Harbourmaster. Sweep every upgrade icon from left to right and buy the final missing tier. Ship This should unlock immediately after the last purchase.
All 12 Ultimate Ship Plan Locations
These are the revised Black Flag Resynced locations. Older 2013 Elite Plan coordinates are not reliable for the remake.
| # | Ultimate Plan | Method | Map or Dive Location | Plan Location |
|---|---|---|---|---|
| 1 | Hull Armor | Diving Bell | San Ignacio Wreck | (348, 744) |
| 2 | Mortar Strength | Diving Bell | Antocha Wreck | (600, 636) |
| 3 | Ram | Diving Bell | La Concepcion Wreck | (150, 271) |
| 4 | Swivel Guns | Diving Bell | Devil’s Eye Caverns | (456, 332) |
| 5 | Broadside Cannons Number | Diving Bell | The Blue Hole | (440, 145) |
| 6 | Round Shot Strength | Diving Bell | Kabah Ruins | (738, 120) |
| 7 | Heavy Shot Strength | Treasure Map | Ambergris Key (28, 160) | Misteriosa (271, 178) |
| 8 | Fire Barrel Strength | Treasure Map | Santanillas (191, 218) | San Juan (455, 462) |
| 9 | Heavy Shot Storage | Treasure Map | Cayman Sound (298, 311) | Petite Caverne (863, 235) |
| 10 | Mortar Storage | Treasure Map | Tortuga (851, 352) | Matanzas (312, 617) |
| 11 | Harpoon Strength | Treasure Map | Mariguana Island (847, 514) | Andreas Island (544, 693) |
| 12 | Fire Barrel Storage | Treasure Map | Petite Caverne (862, 237) | Tulum (40, 372) |
Six Diving Bell Ultimate Plans
Ultimate Plans are inside the larger Secret chests, not ordinary underwater chests. Use air barrels and pockets before entering long tunnels.

Coordinates: (348, 744)
- Available during Diving for Medicines.
- After the currents push you into the shark section, swim toward the bell, turn left and enter the broken hull through its side opening.
- Open the large Secret chest inside.
Coordinates: (600, 636)
- Move toward the southernmost point of the dive area.
- The large chest sits inside an exposed section of wreckage.
- Watch the shark and refill oxygen before the final swim.
Coordinates: (150, 271)
- Swim directly north from the Diving Bell.
- Search the broken ship section close to the entry point.
- This is one of the shortest plan routes.
Coordinates: (456, 332)
- Enter the northern tunnel network and follow it to the open-air cave.
- Climb onto dry ground, then take the side tunnel on the left.
- Use every air pocket; this is the trickiest dive route.
Coordinates: (440, 145)
- Swim to the far north edge of the dive zone.
- Stay near the sea floor and look for a broken-open wreck at the end.
- The Secret chest is not surrounded by a large intact ship.
Coordinates: (738, 120)
- Take the northern cave and wait for the current to pass.
- Shelter in the small opening on the right, then continue through the tunnels.
- Rooms with streams of bubbles have ceiling air pockets.

Six Treasure Map Ultimate Plans
Always collect the named map first. Edward only receives the dig prompt at the solution site while that Treasure Map is in your inventory.
Map: Ambergris Key (28, 160)
Dig: Misteriosa (271, 178)
- At Ambergris Key, enter through the underwater cave and climb the central pillars to the upper floor.
- At Misteriosa, fast travel to the viewpoint, turn around and dig left of the fountain behind the temple.
Map: Santanillas (191, 218)
Dig: San Juan (455, 462)
- Climb the tree branches to the small hill for the map.
- Enter San Juan through the underwater tunnel. After leaving the water, dig on the right before climbing the wooden scaffold.
Map: Cayman Sound (298, 311)
Dig: Petite Caverne (863, 235)
- Loot the skeleton on the Cayman Sound beach.
- Inside Petite Caverne, move to the Hutia hunting area at the southern edge and search behind the waterfall rocks.
Map: Tortuga (851, 352)
Dig: Matanzas (312, 617)
- The map is on a skeleton along Tortuga’s eastern shore.
- At Matanzas, go to the south-east corner and dig left of the Mayan Stela behind the waterfall.
Map: Mariguana Island (847, 514)
Dig: Andreas Island (544, 693)
- Approach the Mariguana map icon from the north and crouch through the leaf-covered tunnel in the small cave.
- At Andreas Island, dig on the tiny southern islet with one palm tree.
Map: Petite Caverne (862, 237)
Dig: Tulum (40, 372)
- Loot the map from a skeleton inside Petite Caverne.
- At Tulum, walk to the southernmost beach and dig behind the shipwreck under the palms.

Upgrade Costs and Fast Resource Farming
Use the totals as a full-project budget for the Jackdaw plus the required Great Inagua Harbourmaster development. Money and cargo already spent on upgrades count toward these totals.
- Metal: use the Spyglass to inspect cargo and board Frigates or Man O’ Wars carrying large Metal stacks. Fort captures also give useful one-time bundles.
- Wood: board common trade and military ships, then keep the cargo reward when the Jackdaw does not need an urgent repair.
- Cloth: loot ships and clear plantations or warehouses while traveling between plan locations.
- Reales: sell Rum and Sugar, raid warehouses, complete convoys and collect Kenway’s Fleet income.
- Passive route: Kenway’s Fleet opens in Sequence 4. Send Schooners on cash missions and Brigs on material missions while you continue the story and plan hunt.
- Storage first: buy cargo-capacity upgrades early so large boarding rewards are not discarded at the cap.
How to Trigger the Ship This Trophy
Use one deliberate menu sweep after finding the last plan. It is faster than guessing which upgrade category still has an empty tier.

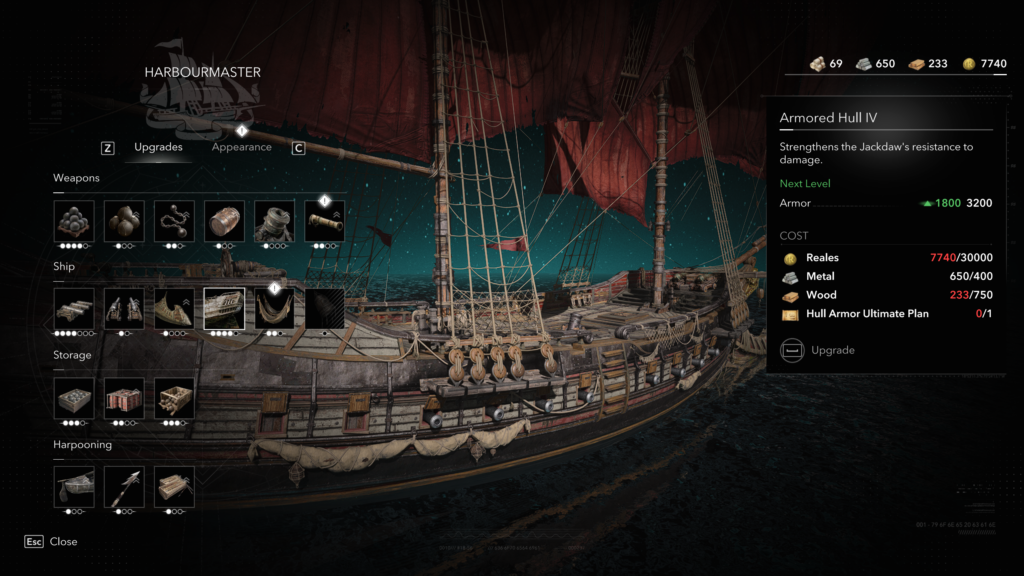
- Travel to any Harbourmaster and choose Upgrade Ship.
- Start at the first Weapons icon and inspect every progression dot. Buy any tier that is not filled.
- Repeat the sweep for Ship, Storage and Harpooning. Include final tiers that do not ask for an Ultimate Plan.
- If a top tier is locked, read the requirement panel. It will reveal a missing Ultimate Plan or an unmet Harbourmaster development gate.
- Purchase the last missing upgrade and remain in the menu for a moment. Ship This should unlock after the transaction completes.
Ship This Not Unlocking?
| Problem | Cause | Fix |
|---|---|---|
| Final tier says Ultimate Plan required | The matching plan was not collected. | Compare that upgrade name with the 12-plan table above and revisit its Secret chest or buried treasure. |
| Buried treasure will not appear | You reached the dig site before collecting its map. | Collect the map from the first coordinate, then return to the solution location. |
| Diving site is unavailable | The Diving Bell is not unlocked. | Complete Sequence 6, Memory 1, Diving for Medicines. |
| Plan owned but top tier remains unavailable | The Great Inagua Harbourmaster is not fully developed. | Return to Great Inagua and purchase every Harbourmaster building tier. |
| All 12 plans collected, no trophy | At least one regular or plan-free upgrade is still incomplete. | Inspect every dot under Weapons, Ship, Storage and Harpooning; do not use the plan count as the completion check. |
| Only cosmetics remain | Vanity slots are separate from functional upgrades. | You do not need to buy every sail, figurehead, wheel, pet or cosmetic for Ship This. |
Ship This Completion Checklist
Use this as a final manual check before spending time farming more materials.
- Hull Armor plan – San Ignacio Wreck
- Mortar Strength plan – Antocha Wreck
- Ram plan – La Concepcion Wreck
- Swivel Guns plan – Devil’s Eye Caverns
- Broadside Cannons plan – The Blue Hole
- Round Shot Strength plan – Kabah Ruins
- Heavy Shot Strength plan – Misteriosa
- Fire Barrel Strength plan – San Juan
- Heavy Shot Storage plan – Petite Caverne
- Mortar Storage plan – Matanzas
- Harpoon Strength plan – Andreas Island
- Fire Barrel Storage plan – Tulum
- Great Inagua Harbourmaster fully upgraded
- Every Weapons progression dot filled
- Every Ship progression dot filled
- Every Storage progression dot filled
- Every Harpooning progression dot filled
- Last purchase completed at a Harbourmaster
Sources and Image Credits
Assassin’s Creed Black Flag Resynced and all gameplay visuals are property of Ubisoft. The 12 Resynced plan coordinates, story gate and upgrade requirements were cross-checked against PowerPyx, PC Gamer, GamesRadar and VGC. Full-project material totals and farming methods were checked against PowerPyx and All Things How. Images are credited to Ubisoft via the linked publication in each caption.
Ship This FAQ
How many Ultimate Ship Plans are in Black Flag Resynced?
There are 12 Ultimate Ship Plans: six in Secret chests at underwater shipwrecks and six in buried treasure chests that require specific Treasure Maps.
Do I only need the 12 Ultimate Plans for Ship This?
No. The plans only unlock the final tiers of matching upgrades. You must also purchase every earlier and final Jackdaw upgrade with Reales and materials.
When can I start collecting every Ultimate Plan?
Complete Sequence 6, Memory 1, Diving for Medicines. It unlocks the Diving Bell required for the six underwater plans.
Why is an Ultimate upgrade still locked after I found its plan?
Fully upgrade the Harbourmaster at Great Inagua. Its development level gates the highest ship upgrade tiers.
Are Ultimate Plans missable?
No. Every plan and upgrade remains available during free roam after the story.
Do Jackdaw cosmetics count for Ship This?
No. Functional upgrades under Weapons, Ship, Storage and Harpooning count. Vanity items such as sails, wheels, figureheads and pets are separate.